
Some art projects are done in a handful of days, some in weeks, while others take many months. This was one of the latter, and it was quite a journey, with so much fulfillment and learning, as well as a few moments of utter despair! It also was a great exemplar of so many common stages of producing an elaborate piece, I thought I'd capture some of it while the memories are fresh.
Initial Inspiration
The first seed of this piece occurred in early summer of 2020. Like just about everyone, I was already so over 2020 and looking ahead eagerly to the coming of 2021. :-) The seemingly innocent thought popped into my head: "I wonder if I could make a piece of art that somehow symbolized 2021?" And so it began...
Developing the Idea
As I tossed this idea around, I first considered the icosahedron, which has 20 faces with 3-fold symmetry. Since 21 is divisible by 3, it seemed feasible that I could develop a sculpture with 21-pointed stars at the center of each of the 20 faces. Alternatively, I could use the dodecahedron, and put the 21-pointed stars at each of the 20 vertices, with 7 points on each of the three corners meeting at a vertex. With this in mind, I turned to the computer to start figuring out whether this would work.
Working out the Pattern
While conceptually simple, the details of getting a pattern like this to work are rather tricky. Islamic star patterns follow a number of aesthetic rules of thumb, and getting everything to balance nicely, especially when working with stars with large and/or unusual numbers of points, is particularly challenging.
I started with an equilateral triangle face for an icosahedron, and after much tussling, was running into some serious aggravation. (Cue moment of despair #1.) However, when I turned my attention to the dodecahedron, and started developing the required pattern on a pentagonal face, suddenly things started falling into place much more naturally,
Two really cool and unexpected things developed as I worked on the pentagonal face pattern.
One was that I realized that a 20-pointed start would fit very naturally at the 5-fold center and would nicely complement the 21-pointed starts at the vertices. Since there are 12 faces, these stars would represent 2012 in the same way that the stars at the vertices symbolized 2021. This was especially meaningful since 2012 was both my first year attending the Bridges conference (which has become a central source of annual inspiration for me), as well as the year I traveled to India and first become hooked on the Islamic design tradition, which I've been exploring in depth ever since. This led to the subtitle: "Ten Years of Inspiration"
Another nice happenstance was that as I developed the areas between the large stars, I realized that ten 7-pointed stars would fit very nicely into the pattern, with only a few degrees of discrepancy with neighboring lines. So by doing a little bit of subtle finessing, I was able to work these in as well (Spoiler: the 7-pointed stars are no longer exactly regular - but you'd never know unless you were told!)

The final pattern with one of many color schemes I tried - close to the final version
Deciding on Materials and Colors
You'd think that getting this elaborate pattern worked out would have been half the battle - but in fact it was probably only about 10%. Any such pattern can be instantiated and decorated in almost countless ways, so I now faced a plethora of artistic questions and decisions:
- Should I thicken and overlap the pattern lines as bands?
- Answer: YES!
- If so, how large does the pattern need to be to accommodate the bands comfortably?
- Answer: A lot larger than I anticipated!
- What overall vibe am I going for?
- Answer: Luxurious artifact from the past.
- What colors should I use?
- Answer: "Royal" feeling colors - blue, magenta, gold...
- What materials should I use?
- Answer: Wood, mat board, acrylic paint
- Should the faces be flat or have some depth to them?
- Answer: Depth, of course! Why make things easy on myself?! ;-)
Throughout this phase, I continued playing with the pattern on my computer, developing a full 3D model of the sculpture, including material depths, band thickness, etc. This was critical to assure myself of several things before I started physically making the piece:
- Can I make the smallest areas big enough to be physically paintable without using tiny brushes and a magnifying glass?
- Answer: Not really. I made it as large as I thought a tabletop sculpture could reasonably be, and still ended up using both of those tools!
- Can I cut out the bands without them falling apart?
- Answer: Barely, after much experimentation with materials, thickness, laser cutter settings, etc.
- How do I adhere the bands to the colored faces?
- Answer: Acrylic leveling gel. I'm in love with this stuff now!

An early 3D model of the entire sculpture + pedestal
Creating the Parts
Having convinced myself that this object was feasible to construct, I set about producing the various parts I would need.
Faces
The faces were fairly easy: pentagons cut out of 1/8" draftboard, with the pattern (single lines only) engraved on the front as a guide for painting, and outlines of the supports on the back to assist later in alignment for gluing.

Bands
These were by far the trickiest to produce. My first several attempts did not work out well. At all. (Cue moment of despair #2.) The material I landed on (1/16" mat board) was the last of several I tried, and balanced the need for the right amount of depth, a fair amount of rigidity, and being an archival material (i.e. acid free). I've since learned that 1/16" plywood is a thing, and for future projects I'd probably try that for greater rigidity.
Inner Supports
Given the size of the piece I wasn't confident that simple glue bonds along the edges would be sufficiently sturdy. For additional support, as well as to help reinforce the proper angle between edges, I create an interior ring of supports for each face, with two square holes along each edge to receive a pair of connectors which had two square prongs at the required angle. (A shout out here to the user "geek2nurse" on the Glowforge Forums, who had already designed these connectors and saved me a couple of additional hours of work!)
Mixing Colors
I tried a large number of color permutations on the computer first, to narrow in on what color set I wanted to use and where. (My wife Jen had some great input during this process -- she too has a great eye for color.) Once I found a combination I liked, I then had to produce those colors in physical paint. In the end, I was able to mix the five end colors I needed using only four base colors:
- Dark blue = Prussian Blue (straight from the tube)
- Medium blue = Prussian Blue + Titanium White
- Light blue = Prussian Blue + MORE Titanium White :-)
- Green = Prussian Blue + Cadmium Yellow
- Magenta = Quinacridone Magenta + Prussian Blue + Titanium White
The inclusion of at least some Prussian Blue in each color lends a certain coherence to the color scheme, I think.
Painting the Faces
I painted the first face as a test, applying 2 coats of white acrylic gesso and then painting each small area by hand. It turned out great, but took a LONG time. Like, a REALLY long time. (Cue moment of despair #3.) Knowing that I had 11 more faces to paint, I looked for a more efficient way to get them painted, and settled on using the laser cutter to cut stencils for each color, to mask the other areas of each face while I worked one color. Although this had its own hassles (mainly, trying to keep the stencil from sticking to the face, and not tearing it at the many very fine connection points), it ultimately allowed me to paint quite a bit more quickly since I didn't have to worry about slopping over onto neighboring areas. The result was not quite as pristinely neat as my meticulously-painted first face, but it didn't have to be, since the edges between areas were going to be covered by the bands anyway.

Painting the Bands
I tried several methods of brush-painting the bands and all were either excruciatingly slow or yielded poor results -- most especially, globs of paint in the fine points of the stars. (Cue moment of despair #4.) In the end I realized that using a spray paint was the only reasonable approach. Two layers of spray primer and 3-4 light coats of metallic gold spray acrylic yield a shiny, slightly raised surface, giving the bands the look of cast metal. Perfect!

Assembling the Faces
Each face had three layers that needed to be layered on top of one another:
- Bands
- Face itself
- Interior supports
Adding the supports to the inside of each face was a simple matter of some wood glue and clamps. Adding the bands to the outside proved to be far trickier. I knew early on that I wanted to use what's known as "self leveling gel" to both protect the painted surface of the face and simultaneously adhere the bands on top. This material is essentially the medium to which pigments are added to create acrylic paint. It is fairly thick and milky white when applied, but is fluid enough to spread out to a level surface while drying (hence the "self leveling" name), and dries completely clear and glossy. This worked really well and looked great - but not without a wrinkle. The bands, being made of a paper-like material, warped slightly due to the moisture of the gel. (Cue moment of despair #5.) I used clamps to hold them flush against the face while the gel dried, but alas removing the clamps often caused some of the beautiful gold paint finish to flake off. (Cue moment of despair #6.) This triggered a whole phase of touch ups that I hadn't anticipated. :-(
Beveling the Faces
I knew from the outset that beveling the edges of the faces would be a very challenging part of the construction. Not only did these angles need to be controlled quite precisely for the faces to fit together well, but I was going to have to bevel the faces AFTER applying the bands, since they too - even though only 1/16" thick - needed to have their ends at the edges beveled for them to fit together properly. I also was limited by not having access to a proper wood shop, so I had to improvise my tools and methods somewhat using what I had available (plus an inexpensive belt sander that I purchased when I realized hand sanding was going to take approximately 7 years!). In the end, I ended up doing the following:
- Removed the majority of the edge material of the faces before adding the bands, using a rotary dremel tool, with an ordinary vacuum cleaner positioned next to me as my "shop vac"
- Created a sanding jig out of parts I designed and cut out on the laser cutter, which fit into the holes in the support structure on the back of the face and held it at the exact angle I needed for the final bevel.
- Used that jig to hold each edge up against the belt sander to get the final bevel
While I got the angles I needed, I also managed to damage a number of the ends of the bands along the edges, as well as creating an unexpected "flap" of the gel layer (which did not sand away like the rest of the material, because it bent out of the way) and then need to be hand-trimmed using an Exacto knife. (Cue moment of despair #7.)
Assembling the Sculpture
Putting the final sculpture together was "just" a matter of gluing together the 12 faces along their edges, with the aforementioned connectors fitted into the interior supports for extra stability. As with all things three dimensional, this was trickier than it sounds, and not without some small errors along the way. The support worked like a charm, but in a couple of places I had to actually omit one or two supports because they were forcing the faces out of alignment due to other small errors in support placement and/or beveling. Also, the bands are so fine that getting those to line up perfectly along the edges was also very difficult. In the end it worked out OK, but again, I could see there were a number of places that would require some final touch up.

Damage, Touch Ups, and Realizing the Need For a Pedestal
Having come all this way, the sculpture was not, unfortunately, totally finished. In addition to the several kinds of touch up I had identified along the way, I soon realized that having the sculpture resting on a face (the only way for it to sit on a surface naturally) meant it was actually sitting on the bands of that layer, and sure enough, the paint finish and even the bands themselves were delicate enough to start sustaining damage. Although the final varnish layer would offer some protection, I quickly become convinced that to protect the sculpture in the long term, it would be necessary to design and create a pedestal to elevate it slightly off of the surface it would be displayed on.
The touch ups proceeded in several stages:
- filling small gaps along the edges
- repairing damaged bands
- general clean up (dusting, trimming away small extra bits, etc.)
- small paint touch ups
Designing the Pedestal
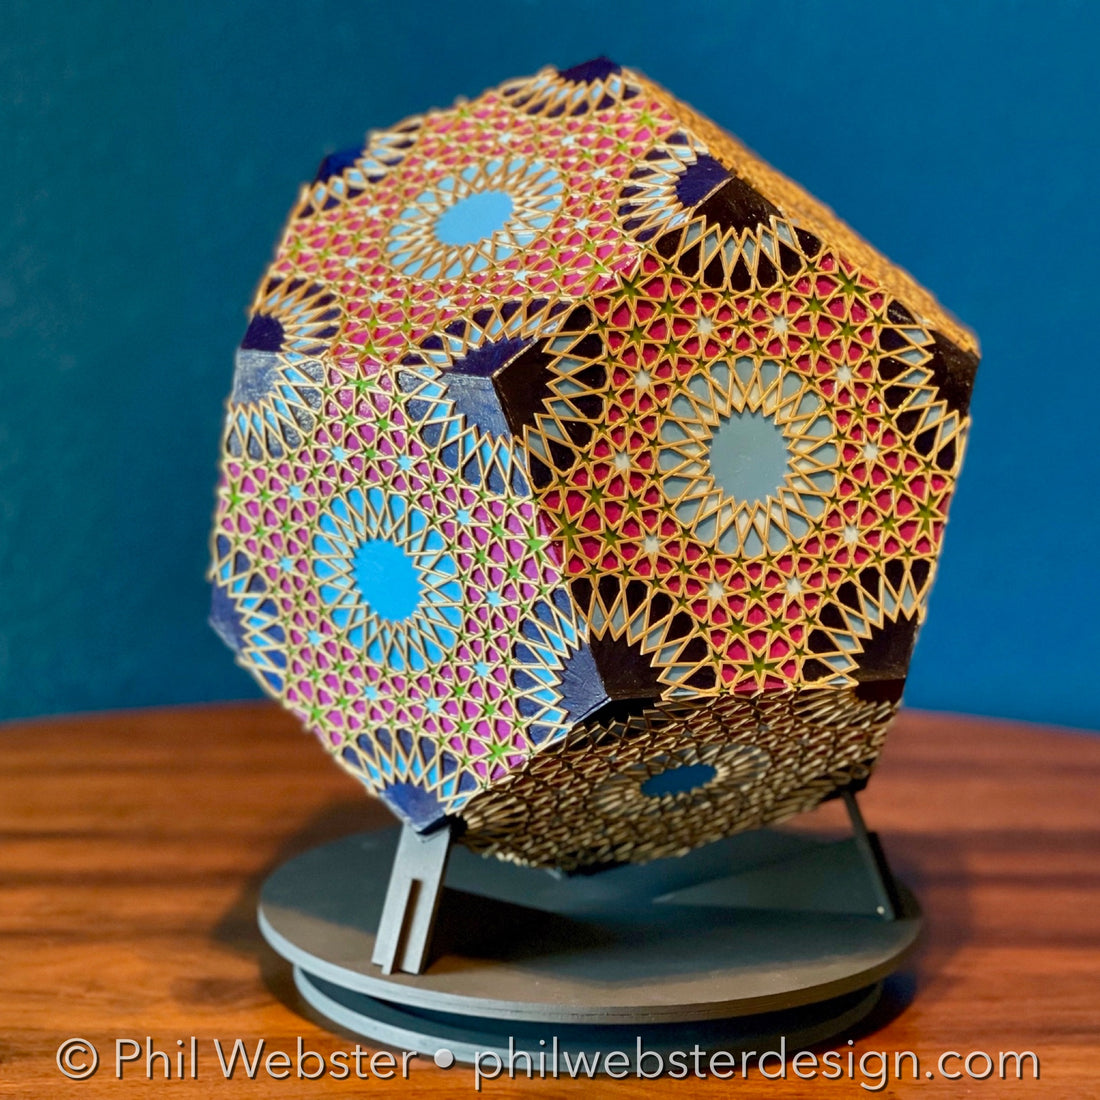
Having resigned myself to the need for a pedestal, I decided to embrace it as another chance to get creative. Initially I just envisioned a simple pedestal with five posts on which the five outer corners of a face could rest (thereby suspending the bands above the display surface). But one of the beautiful things about a complex shape like this is that it looks different from every angle, and has three different axes of rotational symmetry that give the piece a totally different feeling:
- 5-fold axis (looking directly at a face)
- 3-fold axis (looking directly at a corner)
- 2-fold axis (looking directly at an edge)
At first I thought, why not create a pedestal with three different sets of legs (to hold the sculpture in each of the above orientations), as well as put the whole thing on a turntable so that one could gently rotate the entire thing to admire it from any angle? After some initial experiments, I kept the kept the turntable idea, but tossed out two of the orientations and went with just the 3-fold, which is both the most stable and the coolest looking.
Creating the Pedestal
Creating the pedestal was 90% a matter of iterating the initial design to work out the kinks. I had to find ways to stabilize the legs on the base, prevent the sculpture from sticking to the legs (using a bit of cushy foam on the end of each pedestal leg), and make the whole thing really stable and provide adequate places to screw the turntable hardware in. Once that was done, I cut out all the required parts on the laser cutter, assembled them, and painted and varnished the whole thing.
Final Touches
Once all of the touch ups on the sculpture itself were complete, the entire thing got a couple of coats of spray varnish for dust and UV protection, as well as to get an even overall finish. At long last, almost a year after the initial idea, I had a completed sculpture.